After accumulating a lot of weaving, and mustering up even more courage, I've opened my Etsy shop, GrammaKnits. I have to admit that it does take a leap of faith to put your work out there and hope that others appreciate it as much as you do. When you make things by hand, you invest so much more than just your time. Sure there are MANY hours spent planning a project, then executing it. It's your design, you chose the colors and materials, and you spent many more hours spinning, weaving, or knitting. Being so intimately involved in a project, a part of you is always connected with it. I suppose there are people who can just churn things out with the only goal being to sell them, but I think that visibly shows in the final product. Or maybe I'm just sentimentally attached to the things I make. And it is even harder to put a price on your work! I can spend an entire day just planning a woven dishtowel; tinkering with the design, choosing a yarn, playing with the colors, then doing the calculations to fit the design into the towel in a balanced and pleasing manner. Then add in another day or two to wind the warp and dress the loom, depending on the complexity of the pattern. I'm now 3 days in and just getting ready to weave! Then after weaving, there's another day for the finishing process. Selling them is like selling part of your life. I think that's why I just gave things away for so many years. But now that I've retired and materials are getting so expensive, I'm going to try and have my hobby pay for itself. I can still enjoy that creative process, and now I can share it with even more people.
Right now my shop is stocked with a lot of extra items that I've made this year. I need to get busy and make some baskets since I've had some special requests. Plus, Easter will be here before you know it and there's something about a handwoven basket that makes that candy taste extra good!

Wednesday, November 12, 2014

Monday, July 28, 2014
Lace Christmas Ornament
I had a request on Ravelry for a pattern I wrote back in 2002 that was on my old website. Since that doesn't exist anymore, I thought I'd just add it here so it would be available again. And it's free, from me to you. The pattern is for a Lace Ornament Cover that I adapted from an old kit pattern. It's really easy and a great use of little bits of glitzy yarn.


Monday, June 23, 2014
New Addition!
Wow! I can't believe it's been since January that I last blogged! And I thought you had more time after you retired! Well, a lot has been going on but I'm not going to try and catch up on everything in order. I'm going to jump in and give you the fun stuff first. I have a new floor loom, as in brand new! Back in April Roddie and I made a quick road trip up to Yarnorama so that she could look at looms (she's finally come over to the dark side). Susan has several there, and Roddie had been looking at the Baby Wolf online. The moment we saw it, we immediately knew that it was going to be too short. But there sitting next to it was the new 8-shaft Louet David. The weaving height is a bit taller and Roddie could sit at it comfortably. So after she decided that it was the one, I sat down to play with it a little. I swear it had sparkles all around it. Louet has brilliantly re-engineered this loom to fix all the things I don't like about my other looms. Long story short, I ordered one too! I told myself that I would sell the Ashford table loom and the Tools of the Trade loom to make room and partially fund this new one. It would take about 6 weeks to get here, so I had plenty of time. Sure! Eight weeks have now come and gone, and I still have all the looms (along with the spinning wheels). I still have the two up for sale, but so far no takers. And I'm not going to just give them away.
The 95lb box arrived on June 13th, but I had to drive up to Longview for the weekend, so I didn't get to unpack it until late Sunday afternoon. It comes partially assembled, but it still took about 5 hours to get it up and running and that included time watching their video. Since I already had a project picked out, I went ahead and tied up the treadles while putting the loom together. As you can see from the photos below, there is not a lot of room left. The great room that seemed so cavernous when we moved in 15 years ago is now overrun with fiber tools!
and by June 19th I was weaving! Woo-hoo!
The 95lb box arrived on June 13th, but I had to drive up to Longview for the weekend, so I didn't get to unpack it until late Sunday afternoon. It comes partially assembled, but it still took about 5 hours to get it up and running and that included time watching their video. Since I already had a project picked out, I went ahead and tied up the treadles while putting the loom together. As you can see from the photos below, there is not a lot of room left. The great room that seemed so cavernous when we moved in 15 years ago is now overrun with fiber tools!
and by June 19th I was weaving! Woo-hoo!
Thursday, January 30, 2014
Rosepath Baby Wrap
After much gnashing of teeth, it's finally off the loom and finished. It was not a difficult project, but I had some major issues during the weaving. Once I got the cut thread problem sorted out, I was weaving along splendidly. You know how it is when you're on autopilot and everything is good. Then I realized that the loom didn't sound the same when I beat each pick in. Nah, it's just my imagination. So I go a little further. Then I notice that the fell line is crooked! Ack! What's going on here? That little thump I vaguely remember was apparently one of the braces that came loose causing the thread to advance crooked. Kind of hard to explain, so here's a picture.
You can see how the horizontal stripes are wider on one side than the other. Unfortunately, it would have been a nightmare to try and unweave that much, so I very carefully cut out the mistake, fixed the bracket, and soldiered on. Now that the weaving is off the loom, I'm going to take that bracket off and turn it the other direction so that it can't fall out of place. Apparently when someone put the loom together, they put them on backwards. Just look at how much I'm learning though!
Once that was taken care of, things finished very smoothly. Got the fabric off the loom, clipped all the little ends, washed and dried, and it's ready for cutting!
Since we live in such a warm climate I decided to make a sling wrap for our niece, instead of 6yds of fabric to wind around her body. I bought two sets of rings since I hadn't done this before and wasn't sure of what size I needed. It was a good thing. Turns out that this fabric is a bit on the heavy side for a sling wrap. It looks beautiful, but is hard to adjust. I may have to make her another one in something lighter. If you're interested in making your own wrap, I found some great instructions on Jan Andrea's site. I bought the rings online at Sling Rings. Here I am modeling with my teddy bear in the sling.
I still have about 3 yards of fabric left and it's going to go to reupholster my sewing rocker. Someone heavy sat it in and that old fabric finally gave way. This should be pretty AND durable! One of my patients gave me the name of a man that they use, so hopefully it won't be too expensive. I miss having my rocker to spin in.
Friday, December 27, 2013
Argggh! What's This?
I'm getting ready to start a new color block, and notice one thread bubbling up like it doesn't have any tension on it. Normally a broken thread is no big deal, but as I go to the back of the loom to see where it broke, I find a whole section that looks like it's been cut!! OMG! It was hidden under the separating paper, which was probably the only reason it didn't show up sooner.
Now what? Generally when you have a broken warp thread it is a simple matter to tie in a new one and hide the ends. But I've never had this many stop at the same place. This is going to be a pain in the "you know what"! Somehow I'm going to have to stagger the new ends without the overlaps being too close together or they'll show on the surface of the fabric. I'm crushed. I'm already about 1-1/2 yards into the project, and really don't want to have to cut it off and start again. So I guess I'll muddle on, crossing my fingers that I can get past the break and that there aren't any more surprises waiting for me in the next 5-1/2 yards!!
But the bigger question is how the threads were cut in the first place...
Sunday, December 22, 2013
Granny's Peanut Brittle
Every Christmas, for as long as I can remember, my grandmother made all the men in our family their own batch of peanut brittle. And as we all got married, that turned into a LOT of peanut brittle. The first Christmas after she had to move to assisted living, my husband commented on how much he was going to miss that peanut brittle. So I got her "special" recipe and made it for him. A few years later, I was comparing her recipe to the one on the back of the peanut bag. OMG! They stole my grandmother's recipe! I'm sure it was the other way around, but my mom and I had a good laugh over it.
Now I make the peanut brittle for James and Chris, and this year have added my gem of a son-in-law, Shaun. Since several people have asked how to make it, I'll share the recipe with you. I slightly changed it to make measuring easier (no one I know has a 1/3 tsp measure). Before starting, measure all ingredients and have them ready to use. Silicone is the peanut brittle maker's best friend! I use a silicone spatula for cooking, and two buttered silicone baking sheets to pour the peanut brittle onto. Makes it really easy to pick up. Traditionally, my grandmother, mom, and I all had big wooden bread boards that had been seasoned really well, which were used when pouring out the molten brittle. Most of the time this worked fine, but occasionally you'd get a batch that stuck to the board and that was NOT fun! I also use a candy thermometer so that I get really consistent results.
Sophie's Peanut Brittle
2 cups white sugar
1/3 cup water
2/3 cup white Karo (do not use generic brands if they list water in the ingredients)
2 cups raw peanuts
2 Tbl butter
1-1/2 tsp soda
1 tsp salt
In a heavy 2-quart saucepan, bring to a boil sugar, water, and Karo. When the mixture reaches 280º add the peanuts. Stir constantly until mixture turns amber (about 305º to 310º).
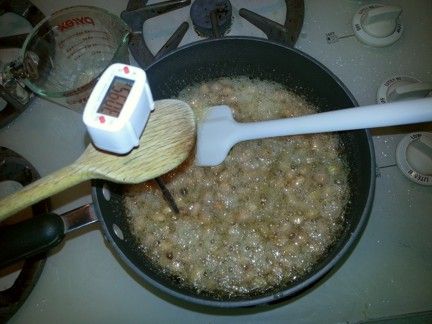
Remove from heat. Stir in butter until melted. Add soda and salt, stirring briefly until creamy. Immediately turn out onto prepared surface.
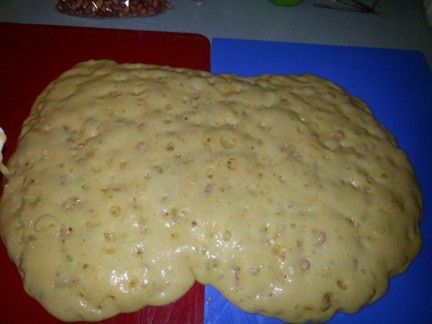
Use silicone spatula to spread mixture to thickness of single peanut, and allow to cool.
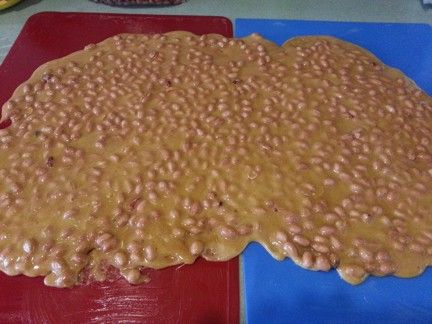
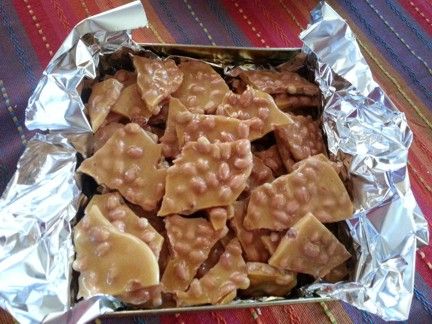
Once cool, break into pieces and place in foil-lined tin. I don't know why it has to be foil, but that's the way Gran did it so I do too.
Now I make the peanut brittle for James and Chris, and this year have added my gem of a son-in-law, Shaun. Since several people have asked how to make it, I'll share the recipe with you. I slightly changed it to make measuring easier (no one I know has a 1/3 tsp measure). Before starting, measure all ingredients and have them ready to use. Silicone is the peanut brittle maker's best friend! I use a silicone spatula for cooking, and two buttered silicone baking sheets to pour the peanut brittle onto. Makes it really easy to pick up. Traditionally, my grandmother, mom, and I all had big wooden bread boards that had been seasoned really well, which were used when pouring out the molten brittle. Most of the time this worked fine, but occasionally you'd get a batch that stuck to the board and that was NOT fun! I also use a candy thermometer so that I get really consistent results.
Sophie's Peanut Brittle
2 cups white sugar
1/3 cup water
2/3 cup white Karo (do not use generic brands if they list water in the ingredients)
2 cups raw peanuts
2 Tbl butter
1-1/2 tsp soda
1 tsp salt
In a heavy 2-quart saucepan, bring to a boil sugar, water, and Karo. When the mixture reaches 280º add the peanuts. Stir constantly until mixture turns amber (about 305º to 310º).

Remove from heat. Stir in butter until melted. Add soda and salt, stirring briefly until creamy. Immediately turn out onto prepared surface.

Use silicone spatula to spread mixture to thickness of single peanut, and allow to cool.

Once cool, break into pieces and place in foil-lined tin. I don't know why it has to be foil, but that's the way Gran did it so I do too.

Friday, December 13, 2013
One door closes...Another opens.
I've been planning my retirement for too many years to count, and finally that day has arrived. A long time ago I imagined it would be a special day, filled with fireworks and festivities to herald a new beginning. What I've found is the reality of a quiet transition to a new phase of my life. The day began and ended with the same exasperating drive to and from work. And in between, I saw the same patients that I do every day. They were so sweet and encouraging, as they are at that point in their lives that they know the importance on living each day to it's fullest. Spend time with those you love, doing what you love, because we never know how many days we have to take advantage.
When I changed careers ten years ago, I never would have imagined how many special people I would meet and get to know, and how much I would learn from each of them. I was granted an opportunity to give of myself, but received so much more. I learned what is important, and what to let fall away. The experience prepared me in so many ways to make the most of this new journey.
Now I'm taking that scary leap into the next phase of my life. There are so many things I still have left to accomplish, and I hope I'm blessed with the time to make them happen. I'm so looking forward to being able to spend more time with family. Not necessarily in flamboyant ways, but to cherish those everyday moments that I felt like I missed with the phrase, "Sorry, but I have to work." It's time to give back to family and friends for supporting me and understanding when I was giving to others.
So stay tuned. One of my goals is to blog once a week. Not that anyone really reads it, but I enjoy so much being able to go back and revisit projects and experiences. I'm going to have to learn now how to balance knitting, spinning, and weaving with housework and family. I have really missed having a clutter-free home, so that's going to be the first project to tackle! That and completing my current weaving project that has a fast approaching due date!
When I changed careers ten years ago, I never would have imagined how many special people I would meet and get to know, and how much I would learn from each of them. I was granted an opportunity to give of myself, but received so much more. I learned what is important, and what to let fall away. The experience prepared me in so many ways to make the most of this new journey.
Now I'm taking that scary leap into the next phase of my life. There are so many things I still have left to accomplish, and I hope I'm blessed with the time to make them happen. I'm so looking forward to being able to spend more time with family. Not necessarily in flamboyant ways, but to cherish those everyday moments that I felt like I missed with the phrase, "Sorry, but I have to work." It's time to give back to family and friends for supporting me and understanding when I was giving to others.
So stay tuned. One of my goals is to blog once a week. Not that anyone really reads it, but I enjoy so much being able to go back and revisit projects and experiences. I'm going to have to learn now how to balance knitting, spinning, and weaving with housework and family. I have really missed having a clutter-free home, so that's going to be the first project to tackle! That and completing my current weaving project that has a fast approaching due date!
Subscribe to:
Posts (Atom)